FLSUN delta printer update for 2017-10-24

Yesterday the new aluminum extruder came from amazon.ca for my delta printer. It was nicely packaged and although the instructions could have been better (b&w photos aren’t great for assembly), they were adequate.

I removed the original plastic-parts extruder and installed the new extruder. It was immediately obvious the mechanism is much better than the original. The toothed wheel is a much finer tooth count, and the idler wheel with notch is much smoother. The spring tension is not adjustable either from close examination nor from the assembly photos, but seems to work in an excellent fashion.

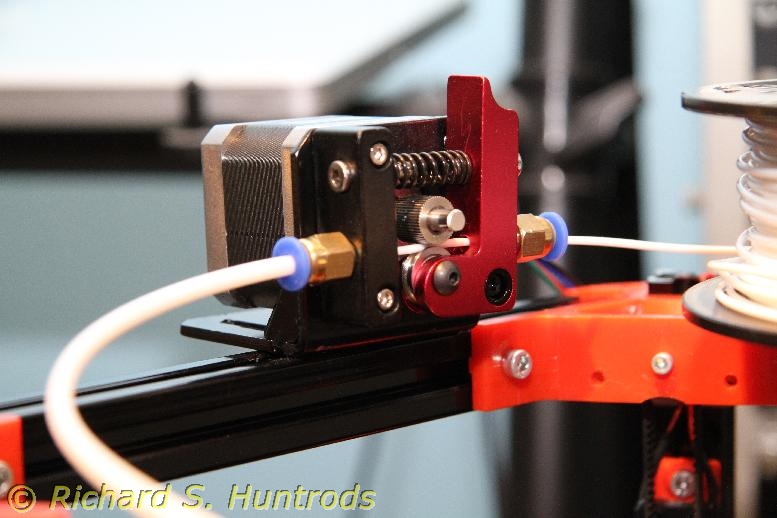
The only hiccup was when I tried to test the calibration. No matter what, I could not get it to extrude. Finally, after much frustration, I realized the two settings in pronterface are not extrude lenght / reverse length, but rather settings for 1.extrude/reverse length and 2. extrude/reverse SPEED. Setting it from the default of 10mm/min to 120mm/min (2mm/sec) was all it took to see some action. Unfortunately the operation was now reversed due to placement of the idler compared to the original extruder.

Fortunately there’s a setting in the configuration.h file for stepper direction which includes the extruder stepper. Flipping the binary option caused the extruder to properly extrude/reverse. Due to the finer gear spacing, asking for 1cm gave 1.4cm. It’s a quick parameter change to fix that and confirm requesting 1cm now gives 1cm extrusion (and retraction).

Finally, I reconnected the filament and tube to the hot end, burning myself severely in the process (2nd degree on a finger which slipped). Once connected I made a test print of the benchy (boat). The first layer is still off, but now at least I can make adjustments knowing the extruder is functioning properly.

Final lesson learned: 185C is VERY, VERY hot. It will cause an instant 2nd degree burn as I found out to my distress. Fortunately immediate cold water followed by ice for 2 hours has reduced the damage significantly.

So… I guess I’m NOT done with Apple

My iPhone 4 is so old now that it’s really getting flakey – freezing up at the most inconvenient times requiring a hard reboot and all that.

So I checked my Virgin mobile plan, and I have some money in the (discontinued) supertab plan. In fact, enough to get a new phone. Now I know there are new phones for $0 on a two-year plan, but I was looking at what I could get for the supertab balance I had.

This is nice as there’s no other way to use up the supertab, so why not spend it on a new phone?

Anyway, it quickly became apparent that Android was out. The phones were either way too cheap, or way too expensive. Besides, I’m not all that thrilled with Samsung phones either as they give you a Samsung mangled Android, not the pure deal.

So what did come up in my search within my (no cost) budget? An iPhone 7. Yep. Apple stuff.

So I went out last week and got it, and it’s actually a very nice phone. More cool, I was able to move all my stuff off the old phone to the new phone in two painless steps as I still have the Macbook available. All I had to do was turn it on, update whatever was out-of-date (including iTunes) and then backup the old phone and restore the new one (data and apps only).

The new phone is, as I said, pretty cool. It’s nice to have something that will last for a few years before getting orphaned again. If the iphone 4 is any indication, that was not really a bad deal for me.

The only thing I had to do was sign up for my same plan for 2 years, which I was using anyway.

So I’m an apple dude again. Kind of. 😉

3D Delta Printer Update

I was not happy with the first prints out of the delta printer. In spite of upgrading the firmware from Marlin 1.0 to Marlin 1.1.3 and running the auto-calibrate several times, things were not as good as I wanted.

One problem was with one axis end stop, which turned out to be loose on the rail. The square nuts (instead of true “T” nuts) was the problem. After much fussing I was able to tighten it, but I think I’ll be buying some proper “T” nuts soon. With that fixed, things were better, but still not great.

I realized another problem was the “probe offset” might not be correct. The Marlin 1.0 default was 0.2mm, but the Marlin 1.1.3 default was 0.7mm. I was using 0.7 and the first layer height seemed high (it wasn’t printing the first layer at all).

Yesterday (Oct 12) I manually calibrated the printer using the paper strip method, then checked the additional distance from “0” to where the probe end stop triggered. It turns out to have a bit of a dead zone. Using the default test height of 315mm, zero was found at 1.13mm. The probe end stop triggers ON at 0.83 but OFF at 0.93. In the middle is a dead zone (0.83) that is either ON once triggered, or OFF before triggering.

As the auto-calibrate uses the probe trigger point, the distance between zero and trigger on was 1.13 – 0.73 = 0.4mm. This was more than 0.2 and less than 0.7 explaining why the auto-calibrate height number was off.

Using the new depth (315 – 1.13 = 313.87) and probe offset (0.4), The prints should be good.

Except they are not.

Watching closely while it started printing, I saw the problem immediately. The bowden extruder mechanism which decouples the extruder from the hot end was not feeding filament properly. Frequently the extruder gear was turning, but no filament was moving. There’s an adjustment wingnut to set the tension, but I found with experimentation that it is just too finicky to work reliably. It seems there is not setting of the tension that will always work first time, and you can’t be fiddling with tension all the time during a long print.

Examining the bowden extruder mechanism, I think I see the problem and the solution. The mechanism is plastic. The idler is a bearing and washers, but the tensioner is just a bolt and wingnut. What is required is a good quality aluminum housing with spring tension similar to that on my cartesian 3d printer that I built.

A quick search on amazon.ca found several excellent choices in the $13 range, so I ordered an appropriate one. It should arrive next week and I’ll resume the testing. I’m quite certain a good extruder will solve the final problems, and perhaps with a final auto-calibrate I’ll be up and running.

Of course, Marlin is now at version 1.1.6, but I’ll hold off trying that until after I get the current version working.

Glassblowing update

Now that the furnace is cold, I’ve had a good look at the lid. In addition to trimming the bricks back to 13.5 x 13.5 inches, I need to replace the metal strip holding the bricks in place.

The original plans from Mark required 4in galvanized sheet metal flashing, which I could not find. I took aluminum flashing and cut it into 4in strips, and that has worked fairly well for years. I’ve replaced parts of it at least once when the tightening mechanism tore the thin aluminum, but it seems to need replacement again as it’s been deformed by the too-large lid.

This time I plan to obtain some 4in sheet metal, somewhere between 24ga and 30ga, with me leaning towards 24-26 ga at the moment. As I cannot source a roll of 4in sheet metal flashing anywhere, I will try Metal Supermarket and see if they will cut me a few 4in slices off some sheet metal.

Stay tuned…