Telescope Fun

Very recently I got a new telescope that will allow me to explore both astral photography and potential robotic control.

They already make ‘robot control’ telescopes, but they cost a lot. I’m looking more at the budget friendly arduino based concept. I certainly have plenty of experience with arduino thanks to my COMP444 course I wrote and teach at AU, so putting a stepper motor on a telescope mount should be quite feasible.

To that end I bought the Celestron Powerseeker 127EQ telescope. It’s relatively inexpensive and still has a proper (if inexpensive) equestrian mount which allows you to track an object as it moves through the night sky with one rotational control. It’s that control that I would be wanting to automate at first.

The other reason for the Celestron 127EQ is that it has a large enough mirror to provide between 50x and 250x power for astral photography. It comes with an eyepiece assembly that accepts 1.25in lenses but is also threaded for 42mm camera adapters. This provides flexibility to put a T-mount on the camera and then use T-adapter eyepieces, direct connection or a Barlow lens to connect the camera (DLSR) to the telescope.

I had to purchase the T-mount and other bits (adapter & barlow) separately as it took some time to determine exactly which ones would work best with my DLSR.

One thing I instantly loved about this telescope is that I was able to assemble it easily and quickly, and then use it immediately. It was easy to aim the telescope across the road at trees and using the low power lens (50x) I could quickly focus on the leaves. Better still, when the camera T-mount and adapters arrived a couple of days later, I was able to easily swap out the eyepiece for the camera and take photos of the leaves. Nothing persuades further exploration than immediate success!

I’ve had telescopes before, but they always frustrated. The worst was an automated telescope I got on points many years ago. It was ‘computer controlled’, but rather than equatorial mount it was powered by simple x-y motors that needed computer interpretation to actually work. Otherwise you had to push ‘up-down-left-right’ buttons to move the finder, which is fine for land but terrible for astronomy. Set-up required finding several stars under computer guidance before it would work, and some of the stars it needed were simply not visible in our skies. To this day it’s never really worked.

So, needless to say, having a telescope that worked ‘first time’ was a joy. Night set-up is even easier. One leg is set to point true N. You set the azimuth based on latitude (49deg N in my case) and the telescope should point to the north star ‘out of the box’, so-to-speak. If not, you tweak the azimuth until you are pointing at the north star, and the telescope is then set. From then on, simply go outside, point the one leg due N and the telescope is ready. Simple and elegant!

Right now it’s too cloudy and too cold (-5 overnight) to be doing much outside after dark, but even now I’ll probably go outside on a clear night just to find Polaris and then photograph the moon. I am looking forward to taking some better pictures of Mars, Saturn and Jupiter as well.
Camera Fun… (not really)

I have a Canon 7D Mk 1. Two actually. I bought one with an underwater housing, and it’s awesome. I bought another locally to use as a spare in case there’s a problem with the UW camera. Housings cost a lot more than cameras for most models, so it’s good insurance to have a spare camera.

Anyway, some time ago the 7D (land) model started to fail. I got “Err 20” errors when I’d try and take a photo. At first it seemed to correlate to using the pop-up flash, but later it simply happened any time, and eventually all the time.

I sent the camera to a Victoria camera shop that could fix Canons, as it was a lot cheaper than sending it back to Ontario – the only Authorized Canon Center in Canada.

It was diagnosed with the problem “stutter failure”. The quoted repair price was good, so I had them proceed. After just over a month, it came back “good as new”. Except, after a couple of weeks, the “Err 20” returned.

I sent it back under repair warranty, and the tech said “I don’t know”. So they sent it back to Canon Canada (in Ontario) to have it diagnosed. It turned out to be the mirror box, which was replaced. Fortunately, it was under repair warranty so I didn’t have to pay anything.

As it turns out, there is a very rare case where both the shutter and mirror box fail, but you can’t diagnose the mirror box until you clear (i.e. fix) the shutter problem. That was the case for my camera.

At any rate, it’s back now and working perfectly. I’ve been using it to take my renovation photos since it came back.

Notes from all over for Dec 22

Just some notes on stuff that’s happening as of Dec 22.

Linda’s Windows 10 computer, after a few configuration teething pains, is running quite well. Getting rid of the lock screen took 3 attempts as Microsoft is determined to foist this crap on users, even to the tune of disabling workarounds with each new update. It remains to be seen if my efforts will work for the longer term as MS is so very determined.

We did blow ‘edge’ away. It’s easily the worst browser I’ve ever seen. Basically, it has almost zero configuration options, and the few it does have it ignores. Gone forever and gladly back to Firefox. Likewise the default ‘mail’ app is gone and Thunderbird again rules the emails. Like edge, ‘mail’ is another MS app that can’t even play nice – not even with other MS things like Outlook. What a damaged, untested, unprofessional piece of crap.

I did install Office 2016 this week thanks to a “Home User Program” deal from MS. Because Athabasca U bought into the whole MS lock-in, we get to buy home versions for really cheap (like $13 for Office 2016 pro!). It’s OK. I personally prefer Office 2013 because that was the last version without “THE RIBBON”. Yet another unwanted MS user interface “update”.

As for my AU work, I can’t hear people on the phone very well, and certainly not upset persons who make talk fast and in a higher register. After consultation with other AU academics, I bought “MagicJack” from the main website as it was on sale. It does come from the USA and took a while to arrive, and the free phone number is only USA, but it does indeed do what it claims. I paid the extra $10 to get a CDN number (Edmonton exchange) and then had AU tie it to my academic 1-888 number. By yesterday it was all working tickety-boo. Better yet – any voicemail message gets emailed to me as an audio file so I can keep track. I can use a headset when calling anywhere in North America (free) so it’s awesome. Eventually I plan to see if it would work to replace most of the land line features, but not yet. First to see it in action.

I bought a leak detector for my underwater camera, and it came after almost a month in the postal system. Still, not bad coming from Slovenia. It’s really well built and should provide extra protection against flooding for the big underwater camera system.

Speaking of which, the replacement Kraken ring light/strobe came a few weeks ago, and worked correctly from the box. Nice to know it wasn’t simply user error but rather some issue with the optical strobe sensor.

That’s all for now. Time for a Christmas break.

Merry Christmas to all, and a very Happy New Year!

More 3D Printed goodies

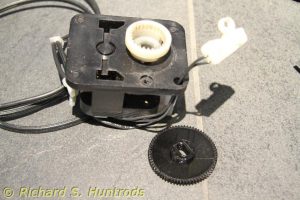
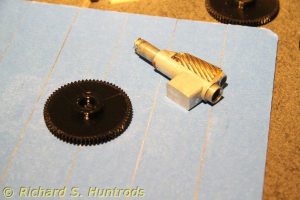
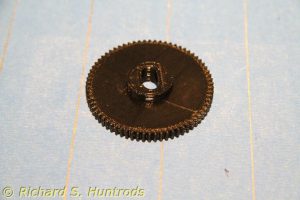
A week ago the ancient electric pencil sharpener died. The motor could be heard spinning when  a pencil was inserted, but no sharpening action. I took it apart to find the large gear that drives the sharpening mechanism was broken in two pieces. As I shook it out, it broke again. Time for a new unit? Not with a 3D Printer! Before I gave up on this item, I would try and print a replacement gear.

Designing gears is not fun, but the on-line CAD program Tinkercad had a community supplied gear builder. I took measurements from the broken gear, counted the teeth (70) and designed a new one. My first print wasn’t correct. The broken gear did not reveal the drive slot was only partially into the gear, with a round shaft for the rest. Once I had one new gear with the slot all through it was easy to see what needed to be done. The next gear fit well and worked. It’s noisy, but it works.


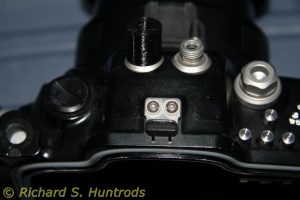
The next challenge was designing an optical connector for my underwater camera housing. The very expensive part from the manufacturer (double any equivalent price) screws onto an optical fitting on the housing. The bare cable has an optical end, but must be mechanically connected to the strobe and housing. On the strobe it’s a simple hole, but I needed something similar on the housing. Again using Tinkercad, I was able to design a simple connector. It took a few tries to get the sizes correct as things must be tight but still fit. After 5 tries I had a good fit. Now to take it to the water for a test dive.  The optical port is shown mounted on the housing on the upper center left.

Photos of recent 3D prints

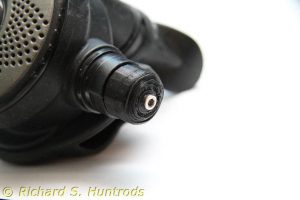
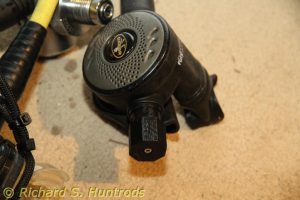
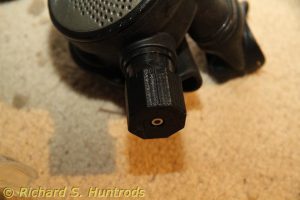
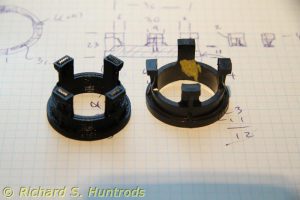
As promised in my last post, here are some photos of the weight plate collar and the new regulator flow knob. Also a photo of the old knob for comparison.

Dacor Fury small knob

Dacor Fury new larger knob

Weight plate collar (the yellow spot marks an original collar)

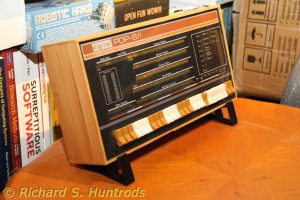
This is a set of base brackets I printed to hold my PiDP8 kit at a better viewing angle (design from Thingverse)

3d Printing – chicken and egg

Last week I designed another gear item for my camera and underwater housing. The 60mm focus gear works perfectly, but I was curious if my 17-85mm zoom lens would work in the housing with the current port.

The problem with ‘just trying it out’ is that while I can put the lens on the camera and fit it in the housing & port, I know that at 17mm there will be vignetting as it’s not a dome port. What I really wanted to test was whether or not it could zoom enough to be useful. However, just trying to install the lens zoomed might not fit. What I needed was to be able to actuate the zoom with a proper zoom gear.

Which meant designing and printing a proper zoom gear. Based on my focus gear design, I created a new model based on the focus gear cylinders, but sized for the zoom lens which had quite a bit larger diameter. The zoom lens also has a noticeable bump where the autofocus switch is located. After a few test prints, I completed the final design and printed it. The first print was very good, and fit perfectly.

With the zoom gear complete, I was able to install the lens on the camera (with zoom gear) and then into the housing on wide angle. Once in, I could clearly see the vignetting, and then tested the zoom gear. Again, it worked perfectly, but the lens quickly bumped the end of the port. Sadly, it was nowhere near close-up, and still showed vignetting. In the end I will not be able to use the zoom lens in the underwater housing with the current macro port, but if I ever win a lottery and buy a dome port, it will work perfectly.


In other news, I’ve been watching a lot of youtube videos on “delta printers”. These are 3d printers that employ a triangle pillar system to control three stepper motors, which in turn move a trapeze supported on the three pillars. It’s a very fluid moving system, and most fun to watch. There is one new version that has one extruder but three filaments, and can mix colors on the fly!

Watching build videos it’s clear that some of these printers are extremely well designed for kit building. The only downside at the moment is there are very few inexpensive kits that offers both heated bed AND multiple extruders. The best kit I’ve found so far (for build quality) comes with only one extruder and no heated bed. While the heated bed is pretty easy to add, conversion to multiple extruders is a very advanced topic. The other downside is many come direct from China, and that’s always a bit of a crapshoot when it comes to the thing actually arriving at my door. So far I’m around 90% but still… to lose a $300-$400 kit would not be good.

Still 3D printing after all these days…

Some notes on what’s been happening in the 3D printer world. Mostly it has to do with software. Here are the highlights:

Tinkercad is still by far the easiest program to create simple designs for test printing and design.

Fusion 360 is slightly superior to Tinkercad but ONLY because it ‘automatically’ bevels holes. I realize that’s just a default parameter setting, but still – it means my final design has a bevel when an interior hole is reduced, which means no support structure required and thus faster/easier printing.

But – Fusion 360 is still a bit of a pain to use, especially compared to Tinkercad. I usually end up deleting my first effort and trying again (and again) to get the desired final result. It’s annoying because the options/interface is so horrid.

Example: I ‘accidentally’ created two bodies when I wanted just one. I don’t know how I did it, and can’t reproduce the case, but once created I could NOT find any way to merge the two bodies back into one. It should be as easy as “select both, press ‘merge'”, but there’s no ‘merge’ function that works this way.

Finally, Sketchup. What a horrid beast of a program so far. Not only is it quite counter-intuitive to build anything like a cylinder, but I cannot find a way to export the result as a printer file. Not looking good for Sketchup at this point.

As for printing, I did discover one odd behaviour about slic3r. If you add multiple designs, say add a gear to a cylinder, or just add two of the same thing and arrange them, the resulting gcode file contains the complete model. HOWEVER, if you save the stl (model) file, only the last thing added gets saved. YOU CANNOT SAVE A COMPOSITE MODEL in Slic3r. That’s a pain, but I can live with it now that I know.


Other news: I built another gear model for the Canon camera. This one is a zoom gear for the 17-85mm zoom lens. The gear is the same one used for the 60mm focus gear I built last week, but the cylinder ID was larger to accommodate the larger diameter of the zoom lens. There were a few other adjustments as well, but the final zoom gear fits and functions perfectly.

I tested the focus gear in the housing underwater last weekend, and will try the zoom gear and lens in the housing this week. If it fits and works, I’ll test it underwater this Sunday.

Note: The zoom lens is not designed for this port, but the port is longer than needed for the 60mm lens, and so I thought I’d like to try it on the camera in the housing. Before I could do that, I really needed the zoom gear to be able to actually test the zoom function in the housing. It’s a ‘chicken and egg’ situation really. Also, until I had any working gear, there was no point worrying about the zoom lens. That dictated the 60mm focus gear being designed and printed first. Once that worked, the way was clear to go for the whole zoom test.